Resolving Data Validation Errors
The Upload Loans: Data Validation page/metro stop displays when there are data errors present in your file.
A red banner message displays at the top of the page with the total number of errors in the loan file.
The page displays all of the loan records in the file that contain data validation errors. The incorrect data fields are highlighted red with the type of error (i.e. invalid format, required field left blank, etc.).

IMPORTANT: If validation errors are present in your file, you must edit and correct all of the data validation errors in order to continue uploading the file.
Follow the steps below to edit a loan record with a data validation error:
- From the Upload Loans: Data Validation page, click on the
 Pencil icon in the Action column to the right of the loan information. The Edit Data pop-up window displays with the incorrect data fields highlighted in red:

- The Edit Data pop-up window displays with the incorrect data fields highlighted in red. Update the applicable data fields for the loan record and select either the Save or Cancel button:
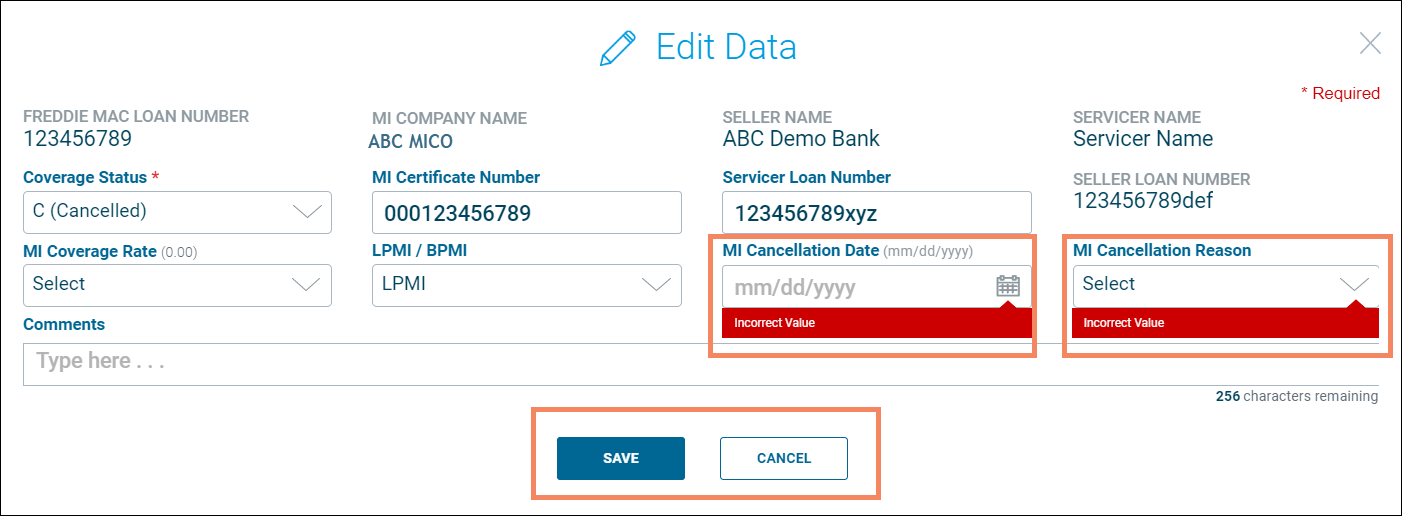
Reminder: You have the ability to edit all of the data fields in the loan record, not only the fields with a validation error.
| Select: | To: |
 |
Keep your loan record updates. The following notification message appears each time you save changes to a loan record:
Proceed to step #3. |
 |
Discard your loan record changes and close the Edit Data pop-up window. Return to step #1 to edit another loan record, if applicable. |

- Once the file is free of data validation errors, a green banner message displays on the Upload Loans: Data Validation page. Select the Cancel, Save or Next button to proceed:
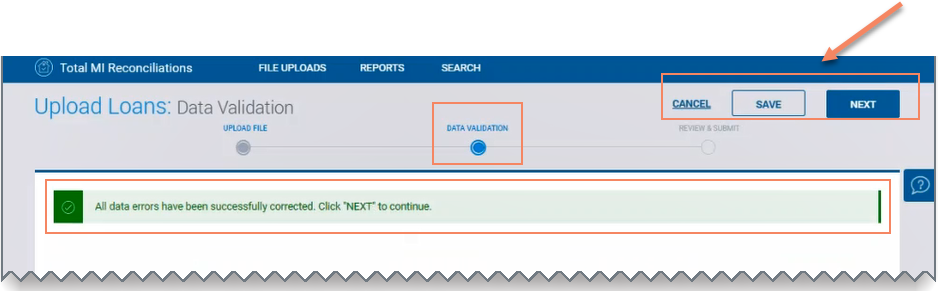
| Select: | To: |
 |
Keep your loan record updates and save the file as a draft. The Draft Upload Saved pop-up box displays:
Select either the You may view, edit, or delete your file from the Draft Uploads page.
If you remain on the Upload Loans: Data Validation page, select either the
|
 |
Continue uploading the file. Refer to step #7 in the Upload the Reconciliation File section for more information on the next step in the file upload process. |
 |
Leave the Upload Loans: Data Validation page and stop uploading the current file. A pop-up box displays prompting you to confirm the cancellation:
Select "Yes Leave" to leave the Upload Loans: Data Validation page and stop uploading the current loan file. IMPORTANT: Upon selecting the "Yes Leave" button, any data that you have typed in without saving will be lost and the current loan file will be permanently removed from Total MI Reconciliations. You will be redirected to the Upload Loans: MI Reconciliation page where you can upload another file, if applicable. Select "No Stay on Page" to remain on the Upload Loans: Data Validation page. Select either the
Refer to step #7 in the Upload the Reconciliation File section for more information on the next step in the file upload process. |

 or
or  button to proceed:


